JobCardsPro — Onboarding Guide
Welcome to JobCardsPro — the complete job card & workshop management platform built for modern automobile showrooms.
📋 What is JobCardsPro?
JobCardsPro is a cloud-based workshop management system that helps automobile showrooms manage the entire lifecycle of a vehicle's service visit — from the moment the car enters the gate to the moment it's delivered back to the customer.
What problems does it solve?
| Problem | How JobCardsPro helps |
|---|---|
| Paper-based job cards get lost | Every job card is digital and searchable |
| No visibility on vehicle status | Real-time status tracking for every car |
| Customer not informed about progress | Real-time status visible on the dashboard |
| Technician workload not tracked | Live allocation and history per technician |
| Reports done manually in Excel | One-click reports with date filters |
| Multiple roles, no access control | Role-based access — show only what each user needs |
🌐 How to Access
Open your browser and go to:
Works best on Google Chrome or Microsoft Edge on desktop. Also accessible on mobile browsers.
🏢 Getting Started — Showroom Registration
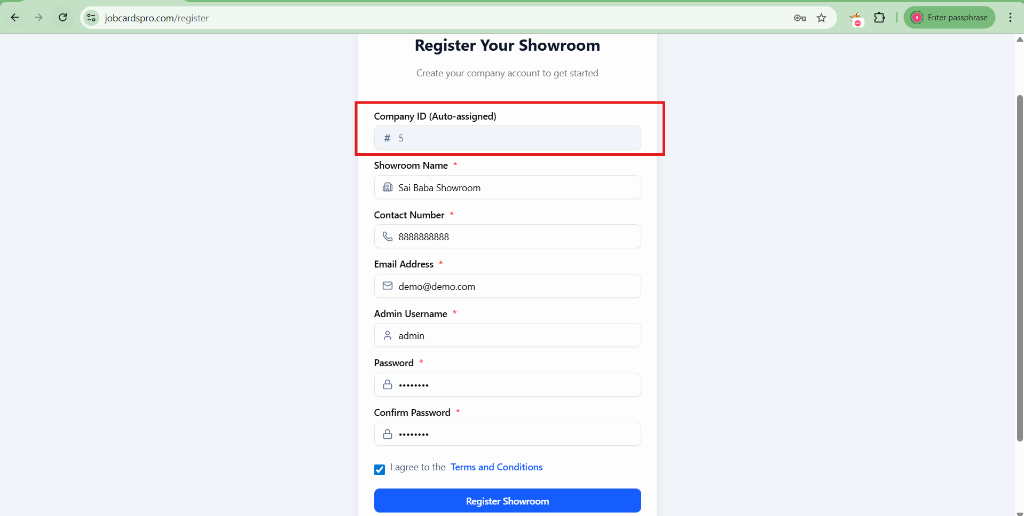
Step 1: Register Your Showroom
- Go to
www.jobcardspro.com/register - Fill in:
- Showroom Name (e.g., "Sai Baba Motors")
- Contact Number
- Email Address
- Admin Username and Password
- Click Register Showroom
[!IMPORTANT] Company ID (Auto-assigned) — When you register, the system automatically assigns a unique Company ID to your showroom (e.g., #5). This number is shown at the top of the registration form. You MUST note this number and share it with ALL your staff. Every single user — receptionists, technicians, gate staff — needs this Company ID to log in. Without it, nobody can access the system.
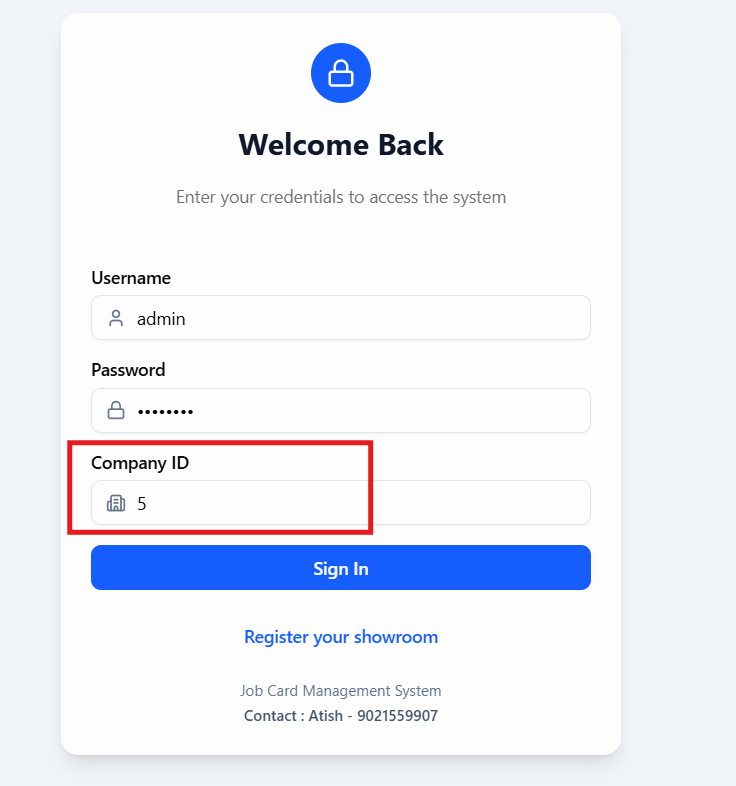
Step 2: Login
- Go to
www.jobcardspro.com/login - Enter:
- Username
- Password
- Company ID ← Your showroom's unique number (e.g., 5)
- Click Sign In
[!IMPORTANT] The Company ID field is required on every login. Share this number with all staff before they attempt to log in. If they don't have it, they will not be able to access the system.
🗂️ System Overview — Who Uses What
JobCardsPro has role-based access. Different users see different modules:
| Role | What they can access |
|---|---|
| Super Admin | Everything — all modules + admin panel |
| Admin | All workshop modules |
| Reception | Reception module (appointments + job card creation) |
| Technician / Shop Floor | Operations/Shop Floor module |
| Main Gate | Main Gate entry/exit only |
| Car Wash | Car Wash module only |
| CCM User | CCM dashboard and reports only |
🧭 Module-by-Module Walkthrough
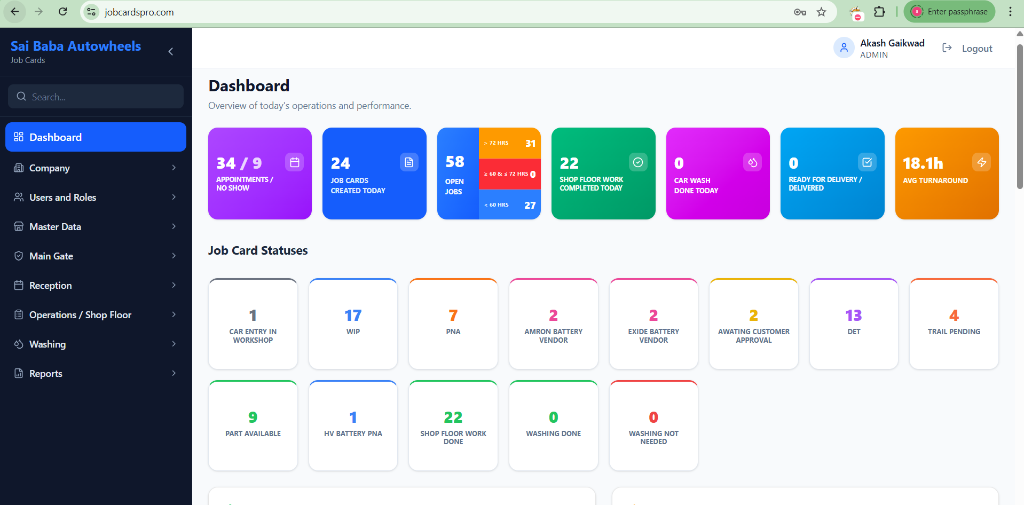
1. 📊 Dashboard
Who sees it: Admin, Super Admin
The Dashboard is your command centre — a real-time overview of the entire workshop.
What you'll see:
- Appointments / No Show — bookings for today vs no-shows
- Job Cards Created Today — new vehicles in today
- Open Jobs — currently active in the workshop
- Shop Floor Work Completed Today — technician completions
- Car Wash Done Today — vehicles washed
- Ready for Delivery / Delivered — pending handovers
- Avg Turnaround — average service time across all jobs
- Job Card Statuses — colour-coded tile count for every status (WIP, PNA, Awaiting Customer Approval, etc.)
2. 🚪 Reception Module
Who uses it: Receptionist, Admin
This is where every vehicle journey begins.
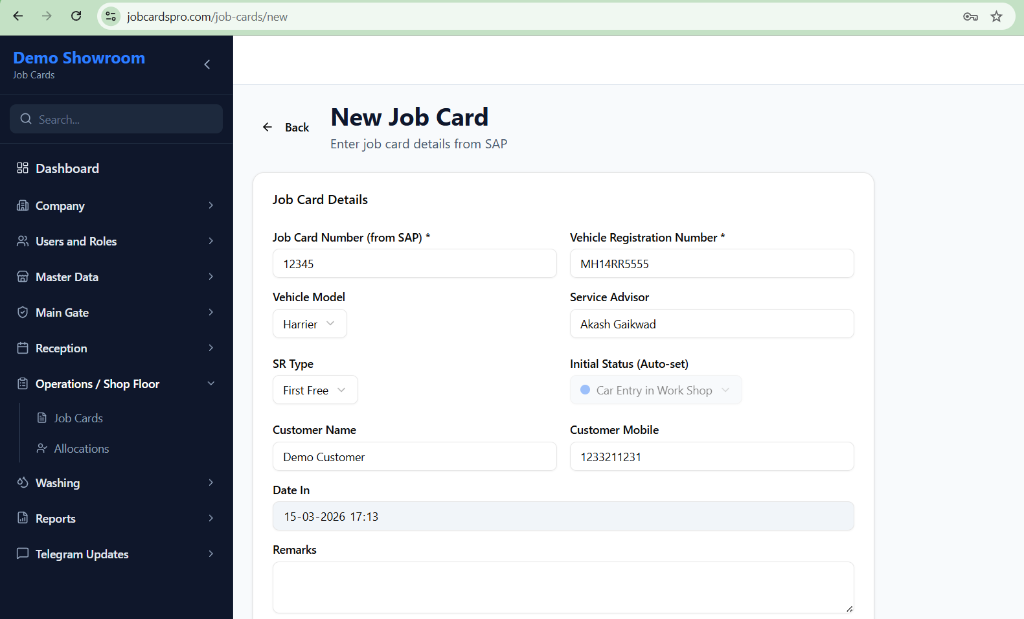
Creating a Job Card
- Click Reception in the sidebar
- Click New Job Card (or go to Reception → Appointments if pre-booking)
- Fill in:
- Customer Name & Mobile
- Vehicle (select from master list or type new)
- Registration Number
- Service Advisor assigned
- SR Type (Paid Service / Warranty / Accident / etc.)
- Date & Time In
- Click Create Job Card
The job card is now created and visible in the Allocations module.
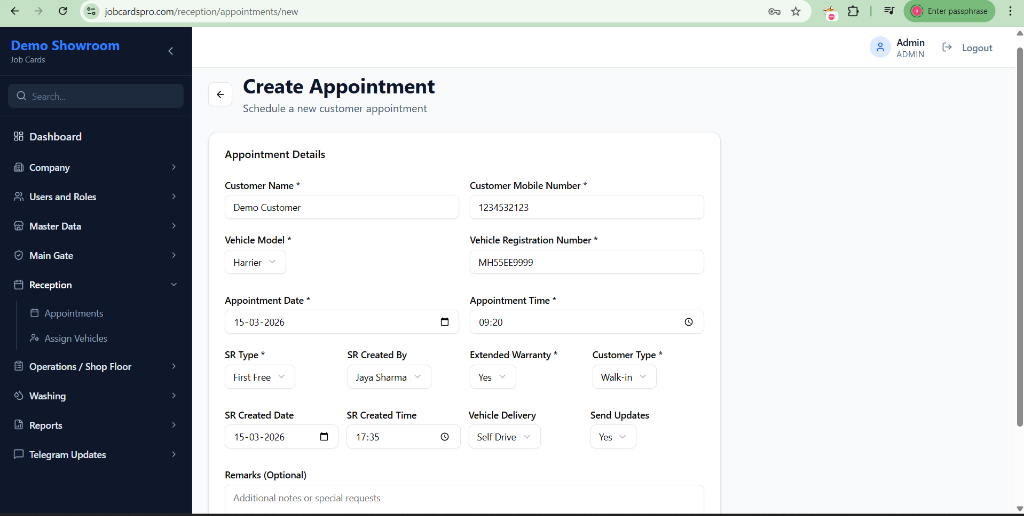
Appointments (Pre-Booking)
Reception can create advance appointments before the car arrives:
- Go to Reception → Appointments
- Click New Appointment
- Fill in the Customer, Vehicle, Date & Time, and the expected SR Type
- Click Create Appointment
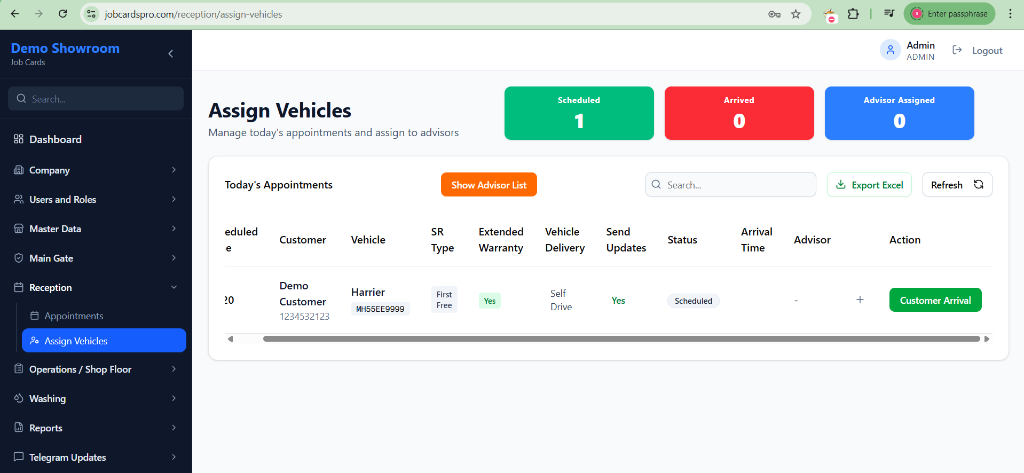
Assign Vehicles (Arrival & Advisor Assignment)
When an appointed vehicle arrives at the showroom, use the Assign Vehicles page to manage the handover to a Service Advisor. This is a simple 3-step flow:
Step 1: Mark Arrival When the customer drives in, find their appointment and click Customer Arrival. The status changes to Arrived and records the exact time.
Step 2: Assign Advisor Once the customer is sitting in the lounge, an advisor needs to be assigned. Click Assign Advisor.

Step 3: Select the Advisor A dropdown appears. Select the available Service Advisor (e.g., Akash) and click the green checkmark ✅ to confirm. The advisor is now officially assigned and the top stat card updates to show "Advisor Assigned: 1".
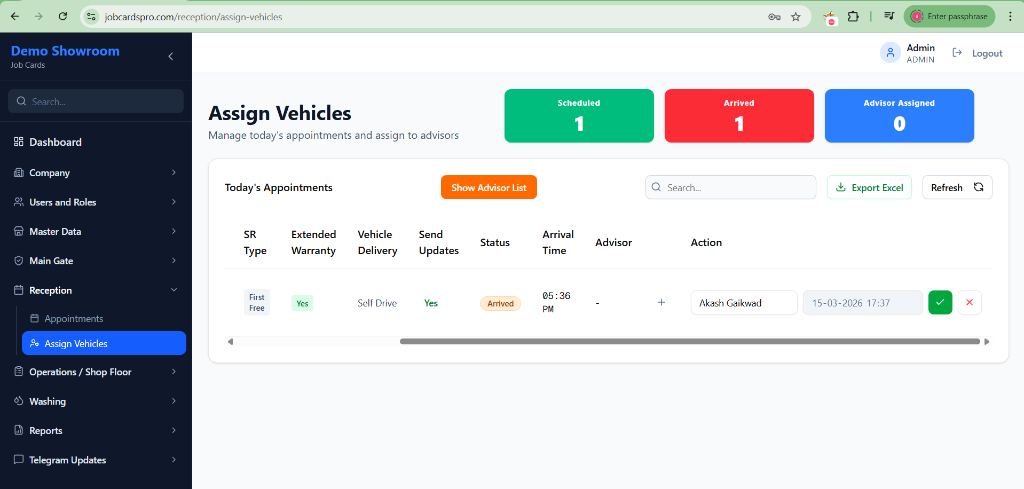
(Note: If you made a mistake, you can click the red 'X' to cancel before confirming).
3. 🔧 Allocations — Job Lifecycle & Tracking
Who uses it: Admin, Shop Floor Manager
This is the core of JobCardsPro — where job cards are managed, technicians are assigned, and statuses are updated.
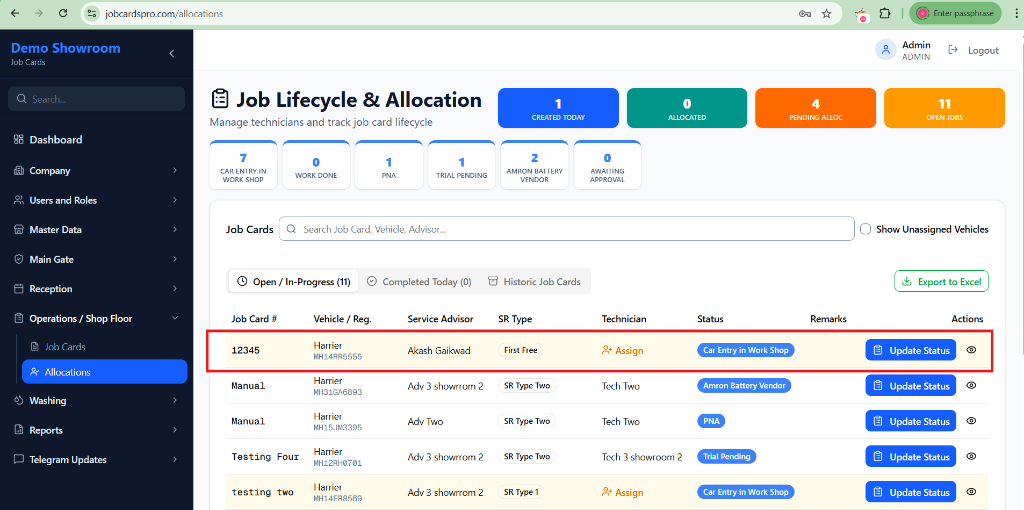
Tabs:
| Tab | What it shows |
|---|---|
| Open / In-Progress | All currently active job cards |
| Completed Today | Job cards closed today |
| Historic Job Cards | Search past records by date range |
Assigning a Technician & Updating Status
- Find the job card in the Open tab
- Click Update Status
- A dialog opens showing:
- Vehicle & customer details
- Current technician & status
- Select/change the Assigned Technician
- Select the New Status (e.g., WIP → Ready for Delivery)
- Click Save Update
The status change is recorded with a timestamp and:
- The dashboard updates in real time
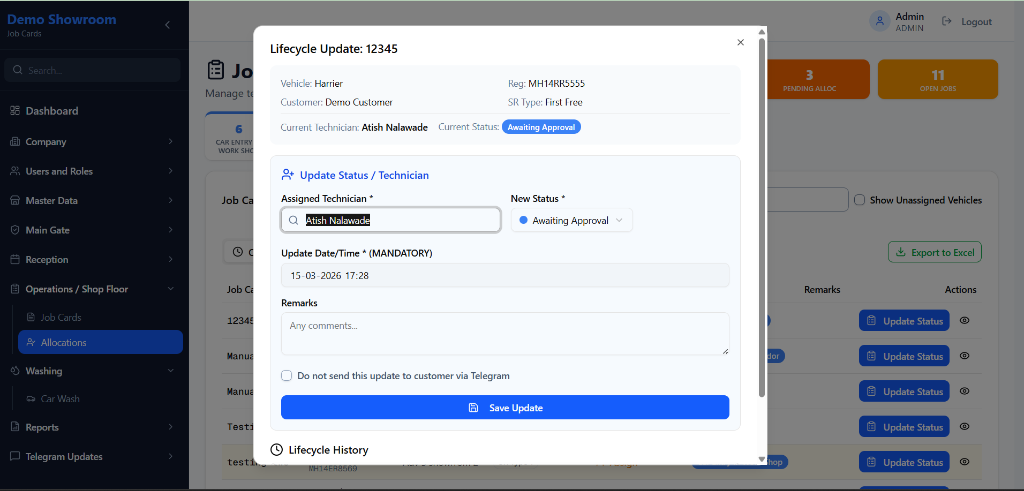
Custom Statuses
Your showroom can define its own statuses (WIP, PNA, AMRON Battery, etc.) with custom colours. All statuses show as filter cards at the top of the Allocations page.
Lifecycle History
Every status change is logged. Click Update Status on any job card to see the full history at the bottom of the dialog — who changed what, when.
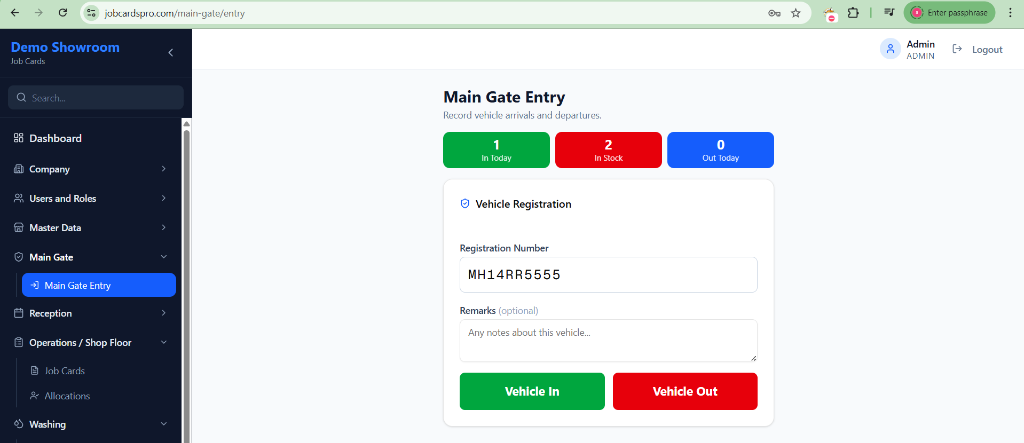
4. 🏁 Main Gate Module
Who uses it: Gate staff, Admin
Tracks vehicle entry and exit at the showroom gate — separate from service job cards.
Features:
- Enter a vehicle registration number to log entry or exit
- Vehicle In (green) or Vehicle Out (red) buttons
- Stat cards at top: In Today, In Stock (currently on premises), Out Today
- See how long each vehicle has been on premises
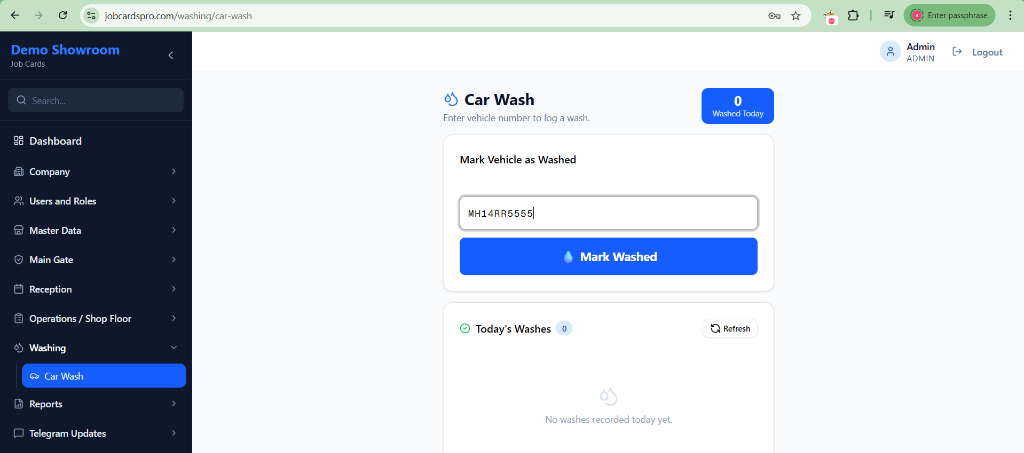
5. 🚿 Car Wash Module
Who uses it: Car Wash team, Admin
Manages the car washing log — a simple, standalone module:
- Enter the vehicle registration number
- Click Mark Washed — the wash is logged with timestamp
- Dashboard shows Washed Today count in real time
- Today's washes list updates live at the bottom
📌 No status changes or job card links needed — washing is tracked independently.
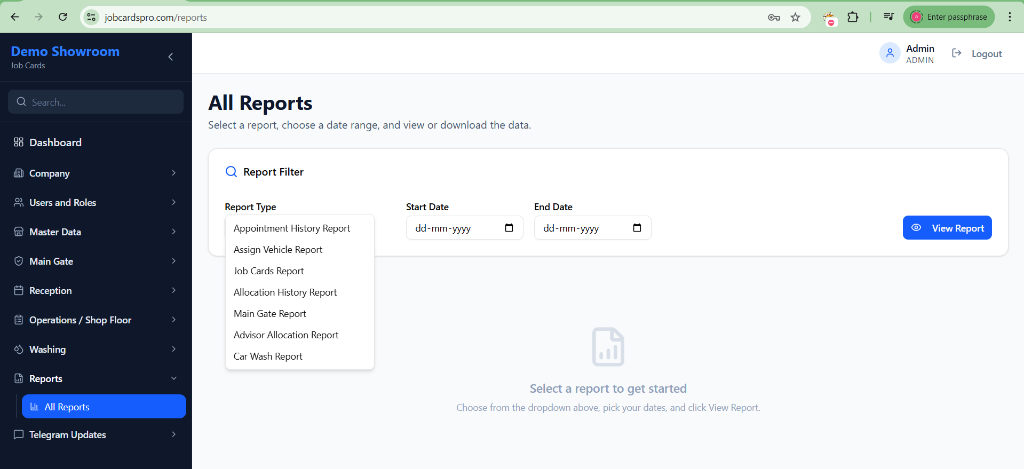
6. 📈 Reports
Who uses it: Admin, Super Admin
One-click access to historical data — select a report type, pick a date range, and click View Report:
| Report | What it shows |
|---|---|
| Appointment History | Past appointments with status |
| Assign Vehicle Report | Which vehicle was assigned to which advisor |
| Job Cards Report | All job cards with full details |
| Allocation History | All status updates with technician, time, remarks |
| Main Gate Report | Vehicle entry/exit log |
| Advisor Allocation Report | Summary by advisor |
| Car Wash Report | Vehicles washed with date/time |
All reports support date range filters and Export to Excel.
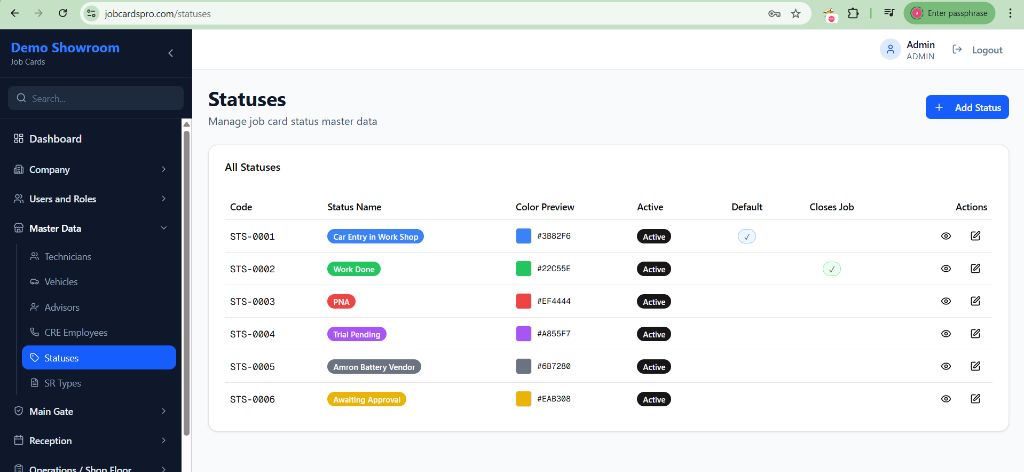
7. ⚙️ Master Data (Admin Setup)
Who uses it: Super Admin / Admin — set up once before going live
This is where you configure everything your showroom needs:
| Section | What to add |
|---|---|
| SR Types | Paid Service, Warranty, Accident, First Free, etc. |
| Statuses | WIP, PNA, Ready for Delivery, etc. — with custom colours and flags |
| Technicians | Name, code, specialization |
| Advisors | Service advisors and their details |
| Vehicles | Vehicle models available at your showroom |
💡 Tip: Set up Master Data fully before creating your first job card. Each status gets a unique colour, a code (STS-0001 etc.), and flags like Default and Closes Job.
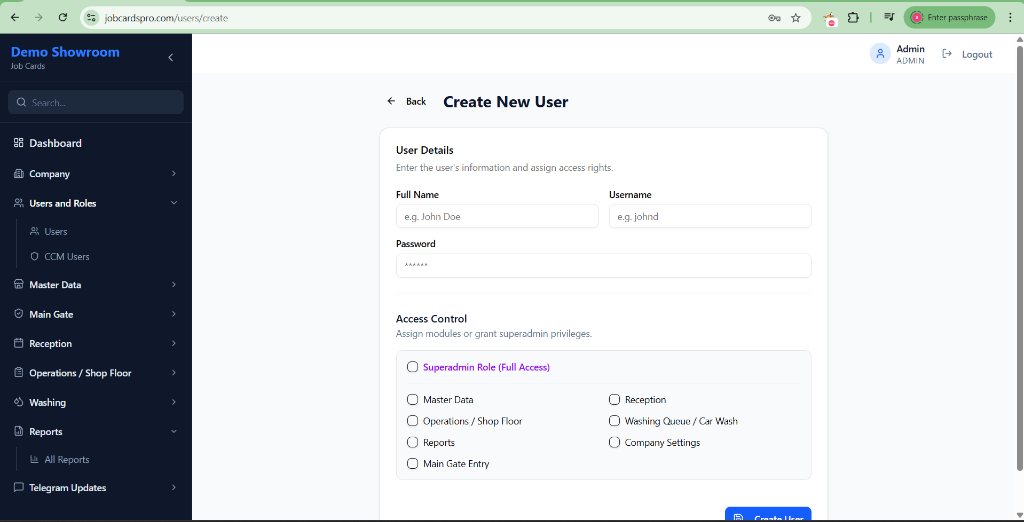
8. 👥 Users & Roles
Who uses it: Super Admin / Admin
Create login accounts for your staff:
- Go to Users and Roles → Users in the sidebar
- Click Create User
- Enter Full Name, Username, Password
- Under Access Control, tick the module(s) they should access:
Master Data/Reception/Operations / Shop FloorWashing Queue / Car Wash/Reports/Main Gate EntryCompany Settings/Superadmin Role (Full Access)
- Click Create User
The user can now log in with your Company ID + their username + password and will only see the modules you've granted.
🔑 Recommended Go-Live Checklist
Before your first real job card, complete these steps:
- Register your showroom at
/register - Add all SR Types (Master Data)
- Add all Statuses with colours (Master Data)
- Add your Technicians (Master Data)
- Add your Service Advisors (Master Data)
- Add your Vehicle models (Master Data)
- Create user accounts for all staff (Users & Roles)
- Train Reception staff on creating job cards
- Train Shop Floor Manager on Allocations module
❓ FAQ
Q: Can multiple users be logged in at the same time? Yes. JobCardsPro supports multiple simultaneous users.
Q: Is data safe if internet goes down briefly? Data is saved on every action. If internet drops mid-form, re-submit once connection is restored.
Q: Can we add our own custom statuses? Yes — go to Master Data → Statuses → Add New Status. You can even assign a custom colour.
Q: What if a job card is created by mistake? Job cards can be cancelled from the job card detail page. Cancelled cards are marked clearly and excluded from active reports.
Q: Can we run reports for a specific advisor or technician? Yes — the Allocation History and Allocations Report support filters by date range.
📞 Support
For help, contact your administrator of JobCardsPro.com - Atish on 9021559907
Document Version: March 2026 JobCardsPro — Built for modern automobile showrooms